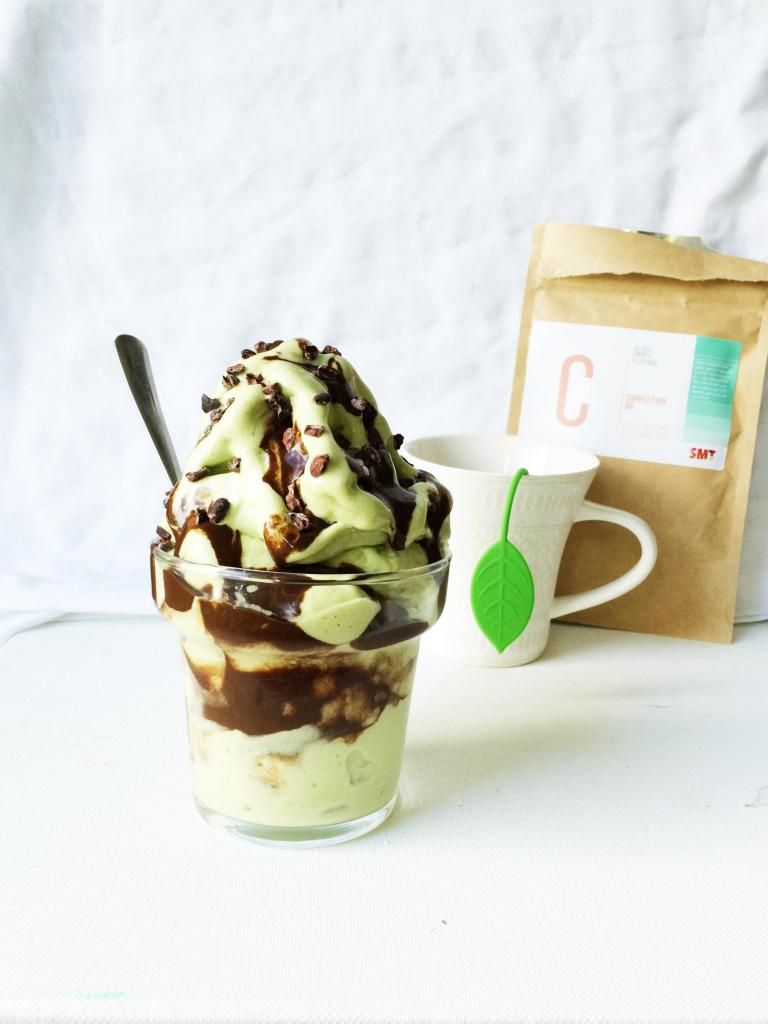
Mint Chocolate Chip Nice Cream

Mint chocolate chip has always been one of my ice cream favourites so I was really happy when I realized that I could totally do a healthy take on this good old classic using bananananas instead of cream. Plus, ice cream making doesn't get any easier than this. Just chuck it all in the food processor and watch magic happen!


Mint Chocolate Chip Ice Cream:

3-4 frozen bananas (~330g)

1/4 cup plant based milk

A few drops of peppermint oil or extract, adjust amount after strength

1 tsp matcha green tea powder

1/2 tsp wheatgrass (optional)

Chocolate sauce:

1 tsp liquid sweetener of choice

1 tsp cacao powder

1 tsp almond milk OR melted coconut oil

Optional:
Vegan chocolate chips/chopped dark chocolate/raw cacao nibs to serve as the chocolate chips


How to:
1. To make the ice cream, simply blend all ingredients in a food processor until completely smooth. I like to blitz everything until all the banana coins have been broken down by the blades before adding the milk. Do what works best for you though, and feel free to add more milk if it won't blend with 1/4 cup.
2. For the chocolate sauce, all you have to do is mix all the ingredients together with a fork. If you decide to use the coconut oil it will harden once you pour it onto the ice cream (provided it hasn't melted ofc) which is kind of cool. 
3. Spoon the nice cream up in a bowl or a tall glass, top with chocolate sauce and chocolate chips and serve immediately!


Creamy Chocolate Overnight Oats

I love to cook my oats on the stove top, the taste and texture really is superior to those of microwaved porridge, but, let's be honest here. Cooking them the traditional way does take a bit more time. Most mornings, that extra time doesn't bother me at all. I'm an early bird (ok, maybe not, but I'd like to think that I am. However, I always set my alarm to the-whole-world's-still-fast-asleep-why-are-you-up o'clock, so what difference does it make?) and I don't mind spending some more time making my breakfasts taste good. But there comes a time in every 17-year-old's life when all you want to do is sleep. Well, several periods of time to be precise. When getting ready for school seems as impossible a task as climbing the highest mountains and when dozing off, sprawled out on the couch at 3 p.m., becomes a habit rather than an exception.  For me, one of those lazy sleep-cycles has just emerged and most days I just want to remain horizontal for as long as I can. What to do with the morning oats then? The oh-so-simple answer is; have them prepared the night before! Genius!

So why haven't you seen more of these über quick breakfasts on my Instagram then? Well to be honest, I've never really liked them, except for a recipe I tried a few months ago, for carrot cake overnight oats (from one of my best Instagram friends Meghan's blog! Thanks Meghs!) which I really liked. But yesterday, I decided to make a recipe of my own, just so that I could stay in bed for a few more (precious) minutes. Turns out that this recipe was actually so good that I have to share it with you guys! So here goes, Creamy Chocolate Overnight Oats!


Recipe:

1/2 cup oats

1/2 cup + 2 tbsp. almond milk

1/4 cup plant-based yoghurt of choice

1 tbsp chia seeds

1-2 tbsp liquid sweetener of choice (I used about 2 tbsp of date purée)

1/2 tbsp cacao or unsweetened cocoa powder

A pinch of salt (optional, but I've found it really elevates the chocolate flavour)

How to:

1. Simply mix all of the ingredients in a bowl or a pretty jar, and stir until they're evenly combined. Put in the fridge for a few minutes, then take it out and stir again so that the chia seeds don't clump up. 
2. Let the oats sit in the fridge until they've thickened up, preferably overnight so you have your breakfast ready to go the next morning! Top with fresh fruit, nut butters or whatever you prefer. Eat, and relish the fact that you get to have chocolate for breakfast. Vegan, gluten-free, healthy and absolutely scrumptious chocolate oats.

Mint Chocolate Chip Pancakes


Dry:

1/3 cup buckwheat flour

2 tbsp. coconut flour

1 tsp. baking powder

Wet:

1 chia egg (1 tbsp. ground or whole chia seeds + 3 tbsp. water)

1 small banana, mashed

1/3 cup almond milk

Mint:

1 tsp. matcha green tea powder

½ tsp. wheatgrass powder

A few drops of peppermint oil or extract (adjust amount according to strength and preference)

Chocolate Chip:

½ tbsp. cacao or carob powder

¼ Squarebar (optional) or ½ tbsp. cacao nibs

How to:
1. First, stir all the dry ingredients together with a fork, to make sure the baking powder is evenly incorporated into the batter. 
2. Prepare your chia egg by grinding your chia seeds either by hand or using a coffee grinder. You could leave them whole but then they’ll take longer to thicken so I prefer doing it this way. 
3. Mix the ground seeds with water, stir and leave to thicken.
4. Mash your (ripe!) banana, fold it into the flour mix along with the other wet ingredients and stir until no clumps remain. 
5. Transfer ½ of the mixture to another bowl, set that aside and mix the rest with the carob or cacao powder. If you want chocolate chips in your pancakes, fold in ¼ of a chopped Squarebar/ ½ tbsp. raw cacao nibs/ 1 tbsp. chopped dark chocolate.
6. In the other bowl, mix the other half of the batter with matcha powder, wheatgrass powder and peppermint extract. Now we have both our chocolate chip and our mint pancakes!
7. Fry the pancakes over medium to high heat for a couple of minutes on each side. Stack, drizzle with chocolate sauce (the one I used is just 1 tbsp chocolate peanut butter thinned out with a splash of almond milk) and add whatever toppings you want!

Minty-breath-kisses, Tilda ;)


Gluten-free (Sliceable) Pizza Crust


Though I’ve never been one for pizzas, I’ve caught myself craving one like crazy more than once these past few months (and no, I’m not pregnant), which got me thinking. What if I made a gluten-free pizza crust based on my recipe for buckwheat wraps? Hmm, that might actually work. So I grabbed my buckwheat flour, chia seeds, herbs, salt and almond milk and just played it by ear. Out came a crust that exceeded my highest expectations! And I'm only exaggerating a little!

First of all, it does not crumble into oblivion when you cut a slice, as I’ve heard many other gluten-free pizza crusts do. You can actually pick up a slice and eat it like that if you want to (although I prefer to roll them up and eat them like “pizza snails” hehe). Second of all, it’s super easy to make and doesn’t require a gazillion different ingredients. Lastly, it tastes pretty good, at least in my own, not-so-humble opinion. Let me now if you give it a try, I’d love to hear how this recipe works for other people than myself!

Gluten-free (Sliceable) Pizza Crust


Serves: 1

50g or about 1/3 cup buckwheat flour

1 chia egg (1 tbsp ground or whole chia seeds + 3 tbsp water)

4 tbsp almond milk

½ tsp psyllium husk (optional but recommended)

Salt and herbs of choice, such as dried oregano or basil

Toppings: A thick tomato sauce loaded with oregano, sliced mushrooms, aubergine, zucchini, bell peppers, artichokes, vegan cheese… it’s up to you!

How to:
1. Pre-heat your oven to 220C. 
2. In a bowl, mix all dry ingredients then whisk in the wet until they’re all evenly combined. 3. Pre-heat a non-stick frying pan (or a skillet with a drizzle of oil on the bottom*), to medium to high heat, pour in the runny "dough" and make a big circle using a spoon. Leave it thicker around the edges for an authentic pizza feeling.
5. Fry for 4-5 minutes or until it’s firm enough to move from the pan, then transfer the crust onto a lined baking tray. 
6. Brush the crust with a bit of oil if you want to (I didn’t but this can prevent soggy bottoms). Spoon on the tomato sauce and desired toppings, then bake the pizza in the oven for 12-15 minutes.

Slice it up, sprinkle generously with nutritional yeast and eat to your heart’s content!

*Note: I have not tried frying the crust in a normal frying pan but I’m sure it’d work just as well as long as you have enough oil in there! It might burn quicker so make sure to watch it carefully and turn down the heat if you must.

Love, Tilda


Cheezy Chickpea Balls

Yesterday, I received a big bag containing Lupin flakes, sent to me by Rhiannon over at Lupin Foods, all the way from Australia. So, what are Lupin Flakes then? The first thought that popped into my mind was Remus Lupin from the Harry Potter books. Ehrm, obviously not the case here. I did a little research on lupin Foods’ website and here’s what I found:

·      Lupins are part of the legume family and are mostly produced in Western Australia


·      Lupins are one of the best sources of vegan protein ON THE PLANET with 40g of protein per 100g dry flakes! (yes, I’m as shocked as you are)


·       If you’re looking to incorporate more fiber in your diet, look no more. Lupin flakes contain 37g of protein per 100g dry flakes. That’s almost 4 times the fiber content of whole wheat flour!


·      There’s no risk of Lupin poisoning when you’re consuming Lupin Flakes; the Australian Sweet Lupin contains only miniscule amounts of the toxic alkaloids found in the bitter varieties so no need to worry.


·      Is one of few vegan foods that contain all the 9 essential amino acids.


The packaging


Those are pretty amazing stats as far as I’m concerned and I really do look forward to using Lupin Flakes in more of my recipes!

This was my first attempt at a lupin recipe and I must say I was pleasantly surprised. These chickpea balls are crunchy on the outside, soft on the inside and provide a wonderful, savoury contrast to the sweet potato fries. Plus, one serving  contains 18g of protein! I mostly stick to a low-protein diet as I don’t believe the overconsumption of protein, that is so common these days, does any good to our bodies. Still, it’s absolutely vital to get enough protein when you’re on a plant-based diet and these balls are the perfect way to do so.

Cheezy Chickpea Balls


2/3 cup chickpeas (canned, drained and rinsed)

2 tbsp Lupin flakes*

1 tbsp nutritional yeast

1 tbsp almond milk

½ tsp psyllium husk

½ tsp dried oregano

Pinch of garlic powder

Salt and pepper to taste

*if you don’t have access to Lupin flakes, you could make the balls without them.

How to: 
1. Pre-heat your oven to 180C. Blend all ingredients with a hand blender and shape meatball-sized balls with your hands. Bake in the oven for 30 minutes or until they’re crisp and golden on the outside.

Easy-peasy Sweet Potato Fries

1 medium sized sweet potato
That’s it!

1. Pre-heat your oven to 170C. Cut your sweet potato into long strips and trim off any thin, sharp edges that might burn in the oven. Place the fries on a lined baking tray and bake in the oven for 40-50 minutes, turning them halfway through for an even bake.

Serve your fries and chickpea balls with lots of veggies and a yummy sauce to dip in if you wish!


Love, Tilda